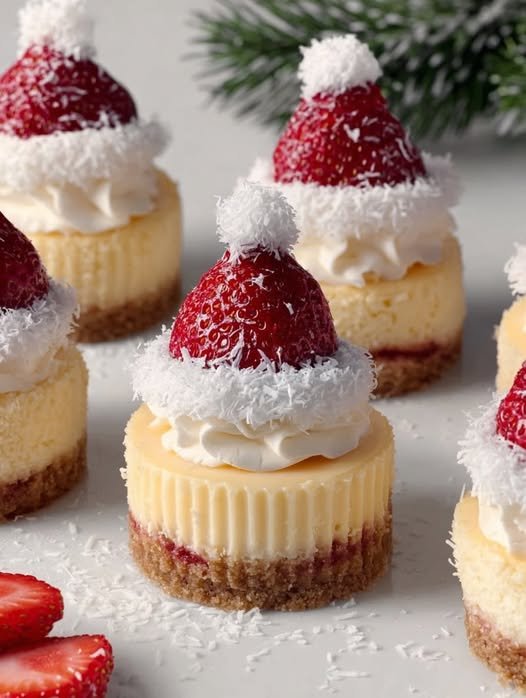
Introduction to Mini Santa Hat Strawberry Cheesecakes
As the holiday season approaches, I find myself dreaming of festive treats that bring joy to my family and friends. That’s where these delightful Mini Santa Hat Strawberry Cheesecakes come in! They’re not just a dessert; they’re a celebration on a plate. With their buttery crust, creamy filling, and charming strawberry hats, they’re sure to impress. Plus, they’re surprisingly easy to whip up, making them a perfect solution for busy days filled with holiday cheer. Trust me, these little cheesecakes will become a cherished tradition in your home!
Why You’ll Love This Mini Santa Hat Strawberry Cheesecakes
These Mini Santa Hat Strawberry Cheesecakes are a delightful blend of ease and flavor. They come together quickly, making them a lifesaver during the hectic holiday season. Each bite is a creamy explosion of sweetness, perfectly balanced by the tartness of fresh strawberries. Plus, their adorable presentation will have everyone smiling. Whether you’re hosting a party or just treating your family, these cheesecakes are sure to spread joy!
Ingredients for Mini Santa Hat Strawberry Cheesecakes
Gathering the right ingredients is the first step to creating these festive Mini Santa Hat Strawberry Cheesecakes. Here’s what you’ll need:
Graham or Speculoos Biscuits: These form the buttery crust. You can use any sweet biscuit you love!
Butter: Melted butter binds the crust together, adding richness.
Sugar: A touch of sugar enhances the crust’s sweetness. It’s optional, depending on your taste.
Strawberry Jam: A thin layer at the bottom adds a fruity surprise.
Philadelphia Cream Cheese: This is the star of the cheesecake filling, providing that creamy texture.
Granulated Sugar: Sweetens the filling, balancing the tanginess of the cream cheese.
Egg: Helps set the filling, giving it a lovely structure.
Heavy Cream: Adds a luscious creaminess to the filling.
Flour: Just a bit helps stabilize the cheesecake.
Vanilla Extract: A splash of vanilla elevates the flavor profile.
Fresh Strawberries: These are the festive hats! Choose large, ripe ones for the best look.
Whipping Cream: Whipped to perfection, it’s the fluffy topping that makes these cheesecakes special.
Powdered Sugar: Sweetens the whipped cream for a delightful finish.
Shredded Coconut: This adds a snowy effect, making your cheesecakes look extra festive!
For exact measurements, check the bottom of the article where you can find everything listed for easy printing. Happy baking!
How to Make Mini Santa Hat Strawberry Cheesecakes
Now that we have our ingredients ready, let’s dive into the fun part—making these Mini Santa Hat Strawberry Cheesecakes! Follow these simple steps, and you’ll have a festive treat that’s sure to impress.
Step 1: Prepare the Crust
Start by preheating your oven to 170°C (340°F). In a mixing bowl, combine the crushed graham or speculoos biscuits with melted butter. This mixture should resemble wet sand. Press it firmly into the bottom of your muffin tin lined with paper liners or silicone molds. Make sure it’s compact; this will hold your cheesecakes together. For an extra touch, sprinkle a little sugar into the crust if you like it sweeter. Once done, add a thin layer of strawberry jam on top. Bake for about 5 minutes, then let it cool.
Step 2: Make the Cheesecake Filling
In a large bowl, beat the Philadelphia cream cheese and granulated sugar until smooth. This is where the magic begins! Add in the egg, mixing gently to avoid overbeating. Next, pour in the heavy cream, flour, and vanilla extract. Mix until everything is well combined. The filling should be creamy and luscious. Don’t be afraid to taste it—just a little! Adjust the sweetness if needed. Once ready, pour this delightful mixture over your cooled crusts, filling them about three-quarters full.
Step 3: Bake the Cheesecakes
Now, it’s time to bake! Place your muffin tin in the preheated oven and bake for 15 to 17 minutes at 160°C (320°F). You want the centers to be slightly jiggly; they will firm up as they cool. Once baked, remove them from the oven and let them cool completely at room temperature. After that, pop them in the fridge for at least 2 hours. This chilling time is crucial for that perfect cheesecake texture!
Step 4: Decorate with Strawberries and Whipped Cream
Once your cheesecakes are chilled, it’s decoration time! Cut the bottoms of your fresh strawberries so they can stand upright. In a separate bowl, whip the heavy cream with powdered sugar and vanilla until stiff peaks form. Pipe a small rosette of whipped cream on each cheesecake, then place a strawberry on top, pointy side up. For the finishing touch, add a tiny dollop of whipped cream on the tip of each strawberry to create a cute little pom-pom. Finally, sprinkle shredded coconut around for that snowy effect. Your Mini Santa Hat Strawberry Cheesecakes are now ready to dazzle!
Tips for Success
Make sure your cream cheese is at room temperature for a smooth filling.
Don’t overmix the filling; it can lead to cracks in your cheesecakes.
Chill the cheesecakes completely for the best texture and flavor.
Use fresh strawberries for a vibrant look and taste.
Feel free to adjust the sweetness of the whipped cream to your liking.
Equipment Needed
Muffin tin: A standard muffin tin works great, but silicone molds are a fun alternative.
Mixing bowls: Use any size you have on hand; just make sure they’re sturdy.
Electric mixer: A hand mixer is perfect, but a whisk will do in a pinch.
Measuring cups and spoons: Essential for accuracy, but you can eyeball it if you’re adventurous!
Whisk: Handy for mixing the filling and whipping cream.
Variations
Chocolate Cheesecake: Swap out some of the cream cheese for melted chocolate to create a rich chocolate version.
Gluten-Free Option: Use gluten-free cookies for the crust to make these cheesecakes suitable for gluten-sensitive friends.
Fruit Toppings: Experiment with other fruits like raspberries or blueberries for a colorful twist.
Vegan Version: Substitute cream cheese with a vegan alternative and use aquafaba instead of egg for a plant-based treat.
Spiced Cheesecake: Add a pinch of cinnamon or nutmeg to the filling for a warm, holiday flavor.
Serving Suggestions
Pair these Mini Santa Hat Strawberry Cheesecakes with a warm cup of spiced chai or hot cocoa for a cozy treat.
Serve on a festive platter, garnished with extra strawberries and a sprinkle of coconut for a beautiful presentation.
Consider adding a scoop of vanilla ice cream on the side for an extra indulgent experience.
FAQs about Mini Santa Hat Strawberry Cheesecakes
Can I make Mini Santa Hat Strawberry Cheesecakes ahead of time?
Absolutely! These cheesecakes can be made a day in advance. Just store them in the fridge after they cool completely. This actually enhances the flavors!
What can I use instead of strawberries for the hats?
If strawberries aren’t your thing, you can use raspberries or even cherries. Just make sure they’re firm enough to stand upright!
How do I store leftover Mini Santa Hat Strawberry Cheesecakes?
Store any leftovers in an airtight container in the fridge. They should stay fresh for up to three days, but trust me, they won’t last that long!
Can I freeze these cheesecakes?
Yes, you can freeze them! Just make sure to wrap them tightly in plastic wrap and then in foil. Thaw them in the fridge before serving.
What’s the best way to serve Mini Santa Hat Strawberry Cheesecakes?
Serve them chilled, garnished with extra whipped cream and a sprinkle of coconut for that festive touch. They’re sure to be a hit at any holiday gathering!
Final Thoughts
Creating these Mini Santa Hat Strawberry Cheesecakes is more than just baking; it’s about spreading joy and making memories. Each bite is a delightful reminder of the warmth of the holiday season. I love how they bring smiles to my family’s faces, turning an ordinary day into a festive celebration. Whether you’re sharing them at a gathering or enjoying them at home, these cheesecakes are sure to become a beloved tradition. So, roll up your sleeves, gather your loved ones, and let the magic of these adorable treats fill your kitchen with holiday cheer!
