Twisted Doughnuts Recipe: How to Make Irresistibly Fluffy Homemade Donuts
Meta Description: Learn how to make twisted doughnuts from scratch with this easy recipe. Fluffy, sweet, and absolutely delicious homemade donuts anyone can master!
There’s something magical about biting into a fresh, warm doughnut that’s still slightly crispy on the outside and impossibly fluffy on the inside. That moment when the sugar melts on your tongue and you realize this isn’t just any doughnut—this is the doughnut you’ve been dreaming about.
And here’s the best part: you don’t need to wait in line at a fancy bakery or settle for store-bought versions that taste like cardboard. You can make twisted doughnuts right in your own kitchen, and they’ll be better than anything you’ve ever bought.
I know what you’re thinking. “Homemade doughnuts sound complicated.” But trust me, if you can make bread or even pizza dough, you can absolutely master this twisted doughnuts recipe. The ingredients are simple, the technique is straightforward, and the results? Absolutely mind-blowing. Your family will think you’ve suddenly become a professional baker, and you’ll have the most popular house on the block.
Why Twisted Doughnuts Are Special
Before we dive into the recipe, let’s talk about what makes twisted doughnuts so irresistible compared to regular ring doughnuts.
The twisted shape isn’t just for looks—though they do look absolutely gorgeous on a plate. That twist creates more surface area, which means more golden, crispy edges and more places for sugar or glaze to cling. Every bite has that perfect balance of soft interior and slightly crunchy exterior.
The Texture That Makes Everyone Ask for Seconds
When you make twisted doughnuts properly, the yeast creates this incredible lightness that makes each bite feel like a cloud. They’re substantial enough to be satisfying but never heavy or greasy. And because you’re making them at home, you control the freshness—which makes all the difference in the world.
Store-bought doughnuts can’t compete with the texture of a doughnut made in your kitchen just an hour ago. It’s the difference between a tomato from your garden and one that’s been shipped across the country. Both are technically tomatoes, but the experience is completely different.
Ingredients You’ll Need for Perfect Twisted Doughnuts
One of the beautiful things about this twisted doughnuts recipe is how simple the ingredient list is. You probably have most of these in your kitchen right now.
Here’s what you need:
• 2-3 tablespoons butter (softened)
– 1 cup milk (warm, not hot)
– 1 egg (room temperature works best)
– 1 pinch salt
– 2-3 tablespoons sugar
– 1 tablespoon active dry yeast
– 2 cups all-purpose flour (plus extra for dusting)
– Oil for frying
– Extra sugar for coating (or glaze ingredients if you prefer)
Why Each Ingredient Matters
The butter adds richness and helps create that tender crumb. The milk provides moisture and helps activate the yeast. The egg binds everything together and adds structure. And the yeast? That’s your magic ingredient—the thing that transforms simple ingredients into pillowy, cloud-like twisted doughnuts that literally melt in your mouth.
Don’t skimp on ingredient quality here. Fresh yeast makes a huge difference. If your yeast has been sitting in your pantry for two years, it’s probably time to buy a new packet. Trust me on this one.
Step-by-Step: How to Make Twisted Doughnuts
Now let’s walk through the process together. I’ll guide you through every step so you can make twisted doughnuts that would make your grandmother proud.
Step 1: Activate Your Yeast
Start by warming your milk to about 110°F (43°C)—warm to the touch but not hot enough to burn your finger. Pour it into a large mixing bowl and sprinkle the yeast over the top. Add about half a teaspoon of your sugar to feed the yeast.
Let this sit for 5-10 minutes. You should see the mixture become foamy and bubbly. This is proof that your yeast is alive and ready to work its magic. If nothing happens after 10 minutes, your yeast might be dead—start over with fresh yeast.
Step 2: Mix Your Dough
Once your yeast is activated and foamy, add the softened butter, beaten egg, remaining sugar, and that pinch of salt. Stir everything together until well combined.
Now start adding your flour, one cup at a time. Stir with a wooden spoon until the dough becomes too stiff to mix easily. At that point, turn it out onto a lightly floured surface and knead by hand.
Knead for about 8-10 minutes. You want the dough smooth and elastic—it should bounce back when you poke it. This kneading develops the gluten structure that gives your twisted doughnuts that perfect chewy-yet-tender texture.
Step 3: First Rise
Place your dough in a lightly greased bowl, turning it once so the top is also greased. Cover with a clean kitchen towel and let it rise in a warm place for about 1-1.5 hours, or until it doubles in size.
This is where patience pays off. I know it’s tempting to rush this step, but that rise time is when flavor develops and the texture becomes light and airy. Use this time to clean your kitchen or scroll through Instagram—you’ve earned a break.
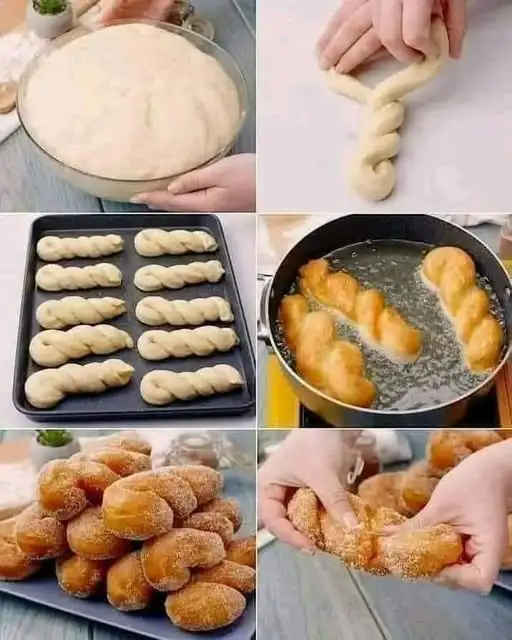
Step 4: Shape Your Twisted Doughnuts
Once the dough has doubled, punch it down gently to release the air. Turn it out onto a floured surface and roll it to about 1/2 inch thickness.
Now for the fun part—creating the twists! Cut the dough into strips about 1 inch wide and 6-8 inches long. Take each strip and gently stretch it, then twist it a few times, pinching the ends together to form a twisted rope shape.
You can also bring the ends together to form a twisted ring—both shapes work beautifully for twisted doughnuts. The key is to not twist too tightly or they won’t expand properly during frying.
Step 5: Second Rise
Place your shaped twisted doughnuts on a parchment-lined baking sheet, leaving plenty of space between them. Cover again with a kitchen towel and let them rise for another 30-45 minutes until they’re puffy and nearly doubled.
This second rise is crucial. Under-risen doughnuts will be dense. Over-risen doughnuts will deflate when you try to move them. You want them puffy but still holding their shape when you gently touch them.
Step 6: Fry to Golden Perfection
Heat about 2-3 inches of oil in a heavy-bottomed pot or deep fryer to 350°F (175°C). Use a thermometer—this is important! Too hot and your twisted doughnuts burn on the outside before cooking through. Too cool and they absorb too much oil and become greasy.
Carefully slide 2-3 doughnuts into the hot oil, being careful not to crowd the pot. Fry for about 2-3 minutes on each side until they’re deep golden brown. They should puff up beautifully in the oil.
Remove with a slotted spoon and drain on paper towels. While they’re still warm, roll them in granulated sugar or dip them in your favorite glaze.
Pro Tips for the Best Twisted Doughnuts
After making twisted doughnuts dozens of times, I’ve learned a few tricks that make the difference between good and absolutely spectacular.
Temperature Control Is Everything
Use a thermometer for both your milk (when activating yeast) and your frying oil. These temperatures matter more than you’d think. The right temperature ensures your doughnuts cook evenly and don’t absorb excess oil.
Don’t Over-Flour Your Dough
When kneading and shaping, use just enough flour to prevent sticking. Too much flour makes your twisted doughnuts tough and dry. The dough should be slightly tacky but not sticky.
Test Fry One First
Before frying your entire batch, test one doughnut. This lets you check if your oil temperature is right and if your doughnuts are risen enough. It’s better to sacrifice one than to ruin the whole batch.
Fry in Small Batches
Don’t overcrowd your pot. Adding too many doughnuts at once drops the oil temperature, resulting in greasy, pale doughnuts instead of crispy golden ones. Patience here pays off deliciously.
Topping and Glazing Ideas
Plain twisted doughnuts rolled in sugar are absolutely perfect on their own, but if you want to get creative, here are some delicious variations.
Classic Cinnamon Sugar
Mix 1/2 cup sugar with 1 tablespoon cinnamon. Roll your warm doughnuts in this mixture for that classic fairground taste that brings back childhood memories.
Simple Vanilla Glaze
Mix 2 cups powdered sugar with 3-4 tablespoons milk and 1 teaspoon vanilla extract. Dip warm doughnuts in this glaze and let them set on a wire rack. Pure heaven.
Chocolate Glaze
Melt 1 cup chocolate chips with 2 tablespoons butter and 2 tablespoons cream. Dip your twisted doughnuts in this glossy chocolate coating for something truly decadent.
Maple Glaze
Mix 2 cups powdered sugar with 3 tablespoons maple syrup and enough milk to reach dipping consistency. This is fall in doughnut form.
Common Mistakes to Avoid
Let me save you from the mistakes I made when I first started making twisted doughnuts.
Using Old Yeast
Check the expiration date on your yeast. Dead yeast means flat, dense doughnuts that never rise properly. It’s the most common reason for doughnut failure.
Skipping the Rise Times
I know you’re excited to eat them, but don’t rush the rising. Under-risen dough makes heavy, dense twisted doughnuts that lack that signature light, airy texture.
Frying at the Wrong Temperature
Too hot and they burn. Too cool and they’re greasy. Get a thermometer and use it. This one tool will improve your results dramatically.
Storing and Reheating Tips
Twisted doughnuts are best eaten fresh, but if you somehow have leftovers (rare in my house), here’s how to store them.
Keep them in an airtight container at room temperature for up to 2 days. Don’t refrigerate—that makes them go stale faster.
To refresh day-old doughnuts, pop them in a 300°F oven for 5 minutes. They won’t be exactly like fresh, but they’ll be close. You can also microwave them for 10-15 seconds, though the oven method is better.
Why Homemade Beats Store-Bought Every Time
Making twisted doughnuts at home gives you something that money literally cannot buy: freshness. A doughnut eaten within an hour of frying is an entirely different experience from one that’s been sitting on a shelf.
You also control the ingredients. No preservatives, no weird additives, just simple, wholesome ingredients that you can pronounce. And the pride you feel pulling off something this impressive? That’s priceless.
Your Kitchen Adventure Starts Now
Making twisted doughnuts is more than just following a recipe—it’s an experience. The smell of yeast dough rising. The satisfaction of shaping each twist. The anticipation as they puff up in hot oil. The joy on faces when people bite into something you made from scratch.
Yes, it takes time. Yes, it requires a bit of effort. But I promise you, when you bite into your first homemade twisted doughnut—still warm, perfectly sweet, impossibly light—you’ll understand why this recipe is worth every single minute.
So grab your ingredients, clear some counter space, and get ready to make the best twisted doughnuts you’ve ever tasted. Your kitchen is about to smell absolutely amazing, and you’re about to become everyone’s favorite person.
Trust the process, follow the steps, and prepare to never look at store-bought doughnuts the same way again. You’ve got this. Now go make some magic happen in that kitchen of yours.
