If you’ve ever dreamed of enjoying the rich taste of summer tomatoes in the middle of winter — without using vinegar or artificial preservatives — this traditional method is a game-changer.
Passed down for generations in rural households, this simple yet genius technique keeps tomatoes fresh, juicy, and flavorful for up to 24 months.
No chemicals. No vinegar. No freezer burn. Just the pure, natural taste of homemade tomatoes — ready to use in sauces, soups, and stews whenever you need them.
Let’s discover how our grandmothers did it… and why it still works today!
🌿 Why Avoid Vinegar or Preservatives?
Most modern recipes for tomato preservation rely on vinegar, citric acid, or freezing. But those methods can:
- Alter the natural flavor of tomatoes.
- Reduce their nutritional value over time.
- Leave a slightly acidic taste not suitable for all recipes.
Traditional preservation techniques, on the other hand, keep tomatoes in their natural state — sealed and protected from air, bacteria, and moisture — while maintaining their sweetness and vitamins.
This old method uses only water, salt, and heat, proving that sometimes the best recipes are the simplest ones.
🍅 Ingredients You’ll Need
To preserve your tomatoes for up to 2 years, you only need a few things:
✅ Ingredients:
- Fresh, ripe tomatoes (medium size, firm, and unblemished)
- Sea salt or Himalayan salt (never iodized)
- Boiled water (cooled slightly)
✅ Equipment:
- Sterilized glass jars with airtight lids
- A large pot or canner for boiling
- A clean towel and a wooden spoon
🧺 Step-by-Step Method
Follow these steps carefully — the secret lies in cleanliness, sealing, and patience.
🥣 Step 1: Choose and Prepare Your Tomatoes
Pick ripe but firm tomatoes — avoid any with cracks or soft spots.
Wash them thoroughly under running water and dry gently with a clean cloth.
You can choose to keep them whole or cut them in half. For larger tomatoes, halves fit better in the jar and absorb the brine evenly.
Optional: make a small cross-shaped cut at the bottom of each tomato to help release air and improve preservation.
🔥 Step 2: Sterilize the Jars
This step is essential. Any bacteria can ruin your batch.
- Wash your jars and lids with hot water and soap.
- Place them in a pot of boiling water for 10 minutes.
- Remove them carefully using tongs and place upside down on a clean towel to dry.
Never use plastic containers — glass preserves flavor and prevents contamination.
🧂 Step 3: Add the Seasoning Base
At the bottom of each jar, add a pinch of salt (about ¼ teaspoon per jar).
If you like, you can add a few dried herbs such as oregano or basil for extra aroma — but the classic recipe uses only salt.
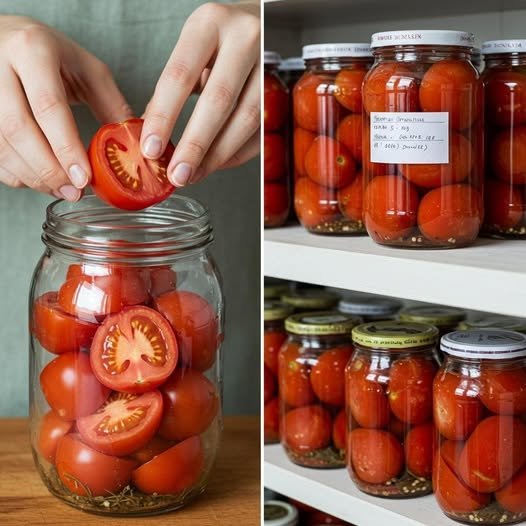
🍅 Step 4: Pack the Tomatoes
Now, fill your jars with the prepared tomatoes.
Press them gently, without crushing, until they are tightly packed.
Make sure to leave about 1 cm (½ inch) of space at the top — this allows proper sealing during heating.
💧 Step 5: Add Boiled Water
Pour hot (but not boiling) water into the jars until the tomatoes are fully submerged.
The water acts as a natural barrier, preventing air and bacteria from reaching the fruit.
Gently tap the jar with a wooden spoon to remove any trapped air bubbles.
🔒 Step 6: Seal the Jars
Wipe the rim of each jar clean to ensure a perfect seal.
Close tightly with sterilized lids.
To create a vacuum, you’ll need to boil the sealed jars (a process called water-bath canning).
🔥 Step 7: The Boiling Process (Canning)
Place the sealed jars upright in a large pot.
Fill the pot with hot water until the jars are fully covered (about 2–3 cm above the lids).
Bring the water to a gentle boil and let the jars simmer for 40 minutes.
Afterward, carefully remove them and place them upside down on a towel.
Let them cool completely at room temperature.
As the jars cool, you’ll hear a “pop” — that’s the sound of a successful seal!
🧊 Step 8: Store Properly
Once cooled, label each jar with the date and contents.
Store in a cool, dark, and dry place — ideally a pantry or cellar.
If done correctly, your tomatoes will stay fresh and flavorful for up to 2 years!
When you open a jar, the smell will remind you of summer — sweet, tangy, and pure.
🧠 Why This Works — The Science Behind It
This method relies on three principles of natural preservation:
- Sterilization: Boiling the jars kills bacteria and molds that cause spoilage.
- Vacuum sealing: When jars cool, the air inside contracts, creating a vacuum that blocks oxygen — the main cause of food decay.
- Salt and heat synergy: Salt helps draw out moisture and enhances flavor while further preventing bacterial growth.
Because there’s no vinegar or additives, the natural pH of the tomato and the sealed environment preserve the food safely.
🥫 How to Use These Tomatoes Later
When it’s time to enjoy your preserved tomatoes, simply open a jar and use them like fresh ones:
- Add to sauces, soups, or stews.
- Mash for homemade tomato paste.
- Slice for bruschetta or sandwiches.
- Blend into smoothies or juice for a natural boost of antioxidants.
Their texture will remain tender but firm — a perfect base for any recipe.
💡 Tips for Success
- Always use new lids each time you preserve.
- Avoid metallic spoons when handling tomatoes (it can alter flavor).
- If any jar lid pops or leaks, discard it immediately.
- Never skip the boiling process — it’s what keeps your tomatoes safe and long-lasting.
🌸 Final Thoughts
In an age of chemicals and preservatives, this old-fashioned method is proof that nature still knows best.
With nothing more than fresh tomatoes, salt, and water, you can preserve the taste of summer for two full years — naturally and safely.
Whether you’re a homesteader, a food lover, or just someone who hates wasting good produce, this recipe is a must-try.
Next time you pick ripe tomatoes, don’t rush to eat them all — preserve them the traditional way and enjoy the flavor of freshness even in winter. 🍅✨
