Grow Roses from Cuttings: The Easy Way to Multiply Your Favorite Blooms
Meta Description: Learn how to grow roses from cuttings with this simple step-by-step guide. Turn one rose plant into many with easy propagation techniques.
Imagine walking through your garden surrounded by dozens of beautiful roses—all descended from that one stunning plant your grandmother gave you, or the gorgeous bush blooming outside your kitchen window right now.
Sounds expensive, right? Like something that would require ordering plants, paying shipping, and hoping they survive the journey to your home.
Here’s the secret nurseries don’t advertise: you can grow roses from cuttings easily, right at home, without spending a fortune. That prize-winning rose you admire? You can clone it. That heirloom variety passed down through generations? You can multiply it endlessly. And you don’t need a degree in horticulture or a greenhouse to do it.
Why Growing Roses from Cuttings Changes Everything
Before we dive into the how-to, let’s talk about why this method is so special and why rose lovers everywhere swear by it.
When you grow roses from cuttings, you’re creating an exact genetic copy of the parent plant. Same color, same fragrance, same bloom size, same disease resistance—everything. It’s like photocopying your favorite rose.
Compare that to growing from seeds, where you never quite know what you’ll get. Seeds produce unpredictable results because of genetic variation. But cuttings? They’re reliable, consistent, and true to the original.
The Money You’ll Save
A single quality rose plant at a nursery can cost anywhere from fifteen to fifty dollars or more for specialty varieties. When you learn how to grow roses from cuttings, you can turn one plant into ten, twenty, or even more—all for the cost of a little potting soil and your time.
That stunning rose hedge you’ve been dreaming about? Suddenly it’s affordable. That idea of gifting rose plants to friends and family? Now it’s actually possible.
What You’ll Need to Get Started
The beauty of learning to grow roses from cuttings is how simple and inexpensive the supplies are. You probably have most of what you need already.
The Essential Supplies
Healthy rose stems – Look for fresh, green stems that are about 6-8 inches long. These should be from the current season’s growth, not old woody stems. You want stems that recently finished blooming or are just about to bloom.
Sharp knife or pruning shears – Cleanliness matters here. Dull, dirty tools can crush the stem or introduce disease. Sharp, clean cuts heal faster and root better.
Pot or container with drainage holes – Small pots work perfectly for individual cuttings. You can also plant several cuttings in a larger container if you prefer.
Rich, well-draining potting soil – Regular garden soil is too dense. You want a light potting mix that holds moisture but doesn’t become waterlogged.
Rooting hormone – This is optional but dramatically increases your success rate, especially if you’re new to propagating roses. It’s inexpensive and one container lasts for years.
Water – Obviously essential, but worth mentioning because watering technique matters when you grow roses from cuttings.
Step-by-Step: How to Grow Roses from Cuttings
Now for the practical part—the actual process that turns a simple stem into a thriving new rose plant. Follow these steps and you’ll be amazed at how well this works.
Step 1: Cut the Stems Correctly
Timing and technique matter when selecting and cutting your stems. Early morning is ideal because stems are fully hydrated then.
Choose fresh, green rose stems that are about as thick as a pencil. They should be firm but not woody—somewhere between soft new growth and hard old wood. Make your cut at a 45-degree angle just below a leaf node (that’s the bump where leaves attach to the stem).
Why below a leaf node? Because that’s where the plant naturally produces growth hormones and where roots form most readily. You’re working with the plant’s biology, not against it.
Step 2: Prepare Your Cuttings for Success
Once you’ve cut your stems, it’s time to prepare them properly. This step significantly impacts your success rate when you grow roses from cuttings.
Remove all the lower leaves, leaving only two or three sets of leaves at the top. Those bottom leaves would rot if buried in soil, potentially causing the whole cutting to fail.
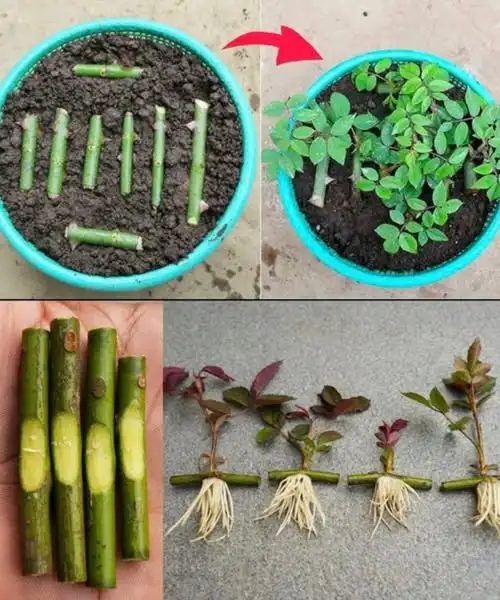
Here’s a technique many beginners skip: gently scrape away a thin layer of bark from the bottom inch of the stem. This exposes the cambium layer—the living tissue just under the bark where roots form. You’re creating more surface area for roots to emerge.
Step 3: Apply Rooting Hormone
While you can grow roses from cuttings without rooting hormone, using it genuinely improves your odds, especially with varieties that are harder to propagate.
Simply dip the scraped bottom end of your cutting into the rooting hormone powder, making sure to coat the wounded area. Tap off any excess—you want a light coating, not a thick layer.
If you don’t have rooting hormone, you can still proceed. Many rose varieties root readily without it, though it may take a bit longer.
Step 4: Plant in Prepared Soil
Fill your pots with moistened potting soil—moist but not soaking wet. Make a hole with a pencil or your finger about 2-3 inches deep.
Insert your cutting into the hole, then gently firm the soil around it so it stands upright on its own. The buried portion should include at least two leaf nodes.
If you’re planting multiple cuttings in one container, space them so the leaves don’t touch. Air circulation helps prevent fungal problems.
Step 5: Water with Care
After planting, water gently but thoroughly. You want the soil evenly moist throughout, not puddled on top with dry pockets below.
Here’s the tricky balance when you grow roses from cuttings: the soil must stay consistently moist for roots to form, but not so wet that the cutting rots. Check daily by feeling the soil with your finger. If the top half-inch feels dry, water gently.
Step 6: Create a Humid Environment
Rose cuttings need humidity while they’re developing roots. Without roots to draw water, they can dry out quickly through their leaves.
The simplest solution? Cover your pot with a clear plastic bag, making sure it doesn’t touch the leaves. You can use sticks or wire to create a little tent. Or cut the top off a clear plastic bottle and place it over the cutting like a mini greenhouse.
This traps moisture and creates the humid environment roses love. Just remove the cover once daily for a few minutes to prevent mold and allow air exchange.
Step 7: Place in Bright, Indirect Light
Location matters tremendously. Your cuttings need light to photosynthesize and produce energy for root growth, but harsh direct sunlight will stress them before they have roots to support themselves.
A bright windowsill that gets filtered light works perfectly. Or a shaded spot on a porch or patio. Think “bright and warm, but not hot and sunny.”
Step 8: Wait and Watch for Signs of Success
Patience is the hardest part when you grow roses from cuttings. For the first couple of weeks, nothing visible happens—all the action is underground as roots slowly form.
In 3-4 weeks, you’ll start seeing signs of success. New leaf growth is the clearest indicator that roots have formed. You might also gently tug on the cutting (very gently!)—if you feel resistance, roots are establishing.
Some varieties root faster than others. Don’t give up if nothing happens in four weeks. Some cuttings can take six to eight weeks to root, especially if conditions aren’t optimal.
Common Mistakes to Avoid
Even when following instructions, certain mistakes can sabotage your efforts to grow roses from cuttings successfully.
Using Old, Woody Stems
Mature, brown, woody stems are much harder to root than fresh green growth. While it’s possible, your success rate drops significantly. Stick with relatively young, flexible stems for best results.
Overwatering or Underwatering
Both extremes kill cuttings. Too much water and they rot. Too little and they dry out. That “consistently moist but not soggy” sweet spot is crucial.
Too Much Direct Sun Too Soon
Eager gardeners often think more sun equals faster growth. But cuttings without established roots can’t handle intense sunlight. They’ll wilt and die before roots form. Patience with indirect light wins every time.
Giving Up Too Early
Just because a cutting looks unchanged for weeks doesn’t mean it’s failed. As long as the stem is still green and firm, there’s hope. Some cuttings are just slow starters.
What Happens Next: Transplanting Your Success
Once your cuttings have developed a good root system and are showing healthy new growth, it’s time to think about their permanent home.
After about 6-8 weeks of root development, you can begin the transition process. If you’ve been keeping them covered, start removing the humidity tent for increasingly longer periods to acclimate them to normal air.
When they’re thriving and you see vigorous new growth, you can transplant them to larger pots or directly into your garden, depending on the season. Just be gentle with those young roots—they’re still delicate.
The Joy of Endless Roses
There’s something deeply satisfying about learning to grow roses from cuttings. It connects you to gardeners throughout history who’ve propagated their favorite plants this exact way for centuries.
Every successful cutting represents not just a new plant, but a skill mastered, money saved, and the ability to preserve and share roses you love. That heritage rose growing in your great-grandmother’s garden? You can keep it alive and pass it to future generations.
The stunning climber at your friend’s house that you can’t find in any nursery? Ask for a cutting and grow your own. Those expensive garden center roses? Once you buy one, you can multiply it indefinitely.
Start Your Rose Propagation Journey Today
You don’t need to wait for perfect conditions or more experience. The best way to learn how to grow roses from cuttings is simply to try it.
Take a few cuttings—more than you think you need, because not every one will succeed, and that’s perfectly normal even for experienced gardeners. Follow the steps, be patient, and watch nature work its magic.
In just a few weeks, those simple stems you planted will transform into rooted plants ready to bloom. And once you succeed with your first batch, you’ll wonder why you ever bought roses at all when growing them yourself is this rewarding.
Grow more roses naturally, right from your favorite plant. Your garden is about to get a whole lot more beautiful, and your wallet will thank you too.
